Episode 199
What you’ll learn in this episode:
- What makes jewelry so difficult to photograph, and Kim’s tips for capturing jewelry in photos
- What techniques Kim uses to make gemstones look shiny, sparkly and colorful
- Which tools and tips photographers need to get started with jewelry photography
- Common jewelry photography mistakes and how to avoid them
- How to choose the right jewelry photographer
About Kim Nunneley:
Kim Nunneley is a Los Angeles-based IATSE Local 600 photographer specializing in unit photography, gallery, lifestyle and portraiture. She has held various roles, from photographer at a fashion merchandising company to photo assistant, and she has worked at one of the world’s most prestigious photo studios in NYC. She has developed a niche as a jewelry photographer working for major jewelry companies.
Additional Resources:
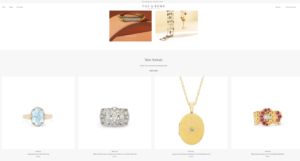
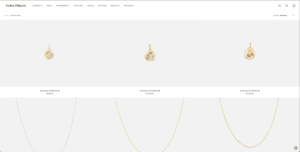
Photos:

Transcript:
A simple photo can never quite capture the real-life beauty of a diamond, ruby or sapphire. That’s why photographer Kim Nunneley relies on a variety of tools, software and experience to make jewelry photographs that shine. She joined the Jewelry Journey Podcast to talk about the mistakes she made when she first started photographing jewelry; her tips for burgeoning jewelry photographers; and what questions jewelry brands should ask to choose the right photographer. Read the episode transcript here.
Sharon: Hello, everyone. Welcome to the Jewelry Journey Podcast. This is the first part of a two-part episode. Please make sure you subscribe so you can hear part two as soon as it’s released later this week.
I’m sure you’ve struggled with making the piece of jewelry that was in front of you look as good in a picture as it does in real life. A good picture attracts customers. The quality of a picture can tell people a lot about your business. After all, you’re selling luxury, and the quality of the picture tells a lot of the story. My guest today is Kim Nunneley of Kim Alexis Photography. She is a photographer who specializes in jewelry. She’ll tell us some of the tricks we should know to take a nice photo. Kim, welcome to the podcast.
Kim: Hi, Sharon. Thank you for having me. I’m really excited.
Sharon: How was it that you came to photographing jewelry? People photograph all sorts of things.
Kim: It’s such a specific niche. About 10 years ago, I had a friend who came to me. She majored in sculpture, and she had just started dabbling in creating jewelry pieces. She said, “Can you photograph some of these?” I had no idea what I was doing. I didn’t realize how reflective jewelry was, any of that. It’s photographing little mirrors, but I did my best. I didn’t know anything about focus stacking, which is really important in jewelry photography. I did my best, and we got some good photos. To this day, she’s still my client 10 years later.
After that, about a year later, I actually got a full-time position as a staff photographer at a fashion merchandising company in New York. Some of the things we had to shoot were jewelry pieces, and then and there I really learned to hone my skills. I learned to use a lightbox, tools that are helpful. I can get into that later, but there are certain tools that are very helpful. I learned a lot at that job. Honestly, just from there, I’ve grown.
Sharon: It’s true that photographing jewelry is harder than other things, would you say?
Kim: Oh, yes. I think it’s the most difficult thing to photograph. I do various types of photography, and I say it’s the most difficult.
Sharon: I never tried. I wouldn’t want to try.
Kim: Making the diamonds sparkly, the opals really saturated. There are techniques for doing that.
Sharon: Is that like where you look at a picture and you know the model has makeup on and everything? Is that what you do in jewelry? Do you make a sapphire bluer?
Kim: Sometimes yes. We make it blue. We tweak it, saturate the colors. There are also composited things, which is a big part of it when you photograph a ring, for example, maybe either a diamond ring or an opal, whatever stone. I shoot the band in a certain lighting situation and then I’ll change the lighting setup and photograph it just for the stones. There’s a technique called compositing where I crop the stone into the other photo. It’s the same with lots of different kinds of photographs, like a poster for a huge blockbuster film where they composite the airplanes, the props, whatever it is. It’s the same thing. You just plug them in.
Sharon: What tools does an amateur photographer need? I always hear about a lightbox.
Kim: Yes, that’s the number one. The most important thing you need is a lightbox. For people that don’t know what a lightbox is, it’s literally a box that’s white or ideally translucent. I use a translucent paper. I actually built my own lightbox. You want it because you want to avoid reflections. That’s basically what you’re trying to do. If you put a ring on a table, you’re going to see reflections coming from everywhere. So, you put it in a lightbox and shine your light through the box, which is why you want translucent paper ideally. That’s the number one thing for anyone, whether you’re an amateur or you’re doing it just for fun. The second thing you need is a macro lens, which allows you to get really, really close up to these little, tiny pieces.
Sharon: Can you have a macro lens with an Apple camera, or do you need a special camera?
Kim: Yes, you need a DSLR. You need a special camera. If you’re just starting out and you don’t have access to that, you can use something not as high quality. But when you’re getting into professional photography, you do need a DSLR camera and what’s called a 100-millimeter macro lens, which allows you to get up close.
Sharon: You’re making me not want to try it. Is there anything else that’s essential besides the camera and the lightbox and the special kind of lens?
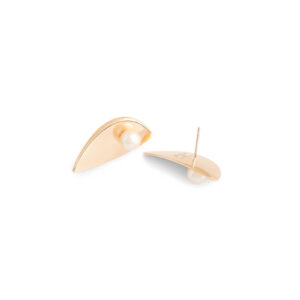
Kim: Then what it comes down to is the props and tools. For example, if we’re photographing earrings—I’m giving away all my secrets—we’ll use an earring stand, but ideally you want it to be clear. Everything that goes in the box should be clear. Sometimes, maybe at the trade shows, you’ll see black velvet. You want to use clear everything, so you’ll use clear earring stands or a necklace holder that’s clear. Usually, it’s made out of plexiglass, so it almost looks like it’s floating in the air. Some clients like to add shadows to their pieces; some don’t want shadows. Everyone has their own distinct vision for the jewelry photography of their own pieces, but that’s really important.
Sharon: I’m going to be a lot more aware of it. Do the outlines of the plexiglass show, or do you just shoot through it?
Kim: Not many people would think to ask that. Yeah, it definitely shows. You can see the outline. That’s something you have to remove in Photoshop. That’s when those Photoshop skills are important.
I didn’t realize this until I started really getting into jewelry photography. I used to just grab an item and put it in with my hands, and then I’d photograph it and go, “Oh, my gosh, I can see my fingerprints.” That’s how close up you can get with these lenses. It’s insane. It’s wild. It’s amazing, but yes, you need special jewelry cloth to make sure you’re not getting dirt on it. You don’t want to see any dirty spots on the pieces. You use special tweezers and tools like that. You want to make sure you’re using the right things. If you have a piece in there and you say, “Oh, it’s not symmetrical,” I used to just grab it with my fingers, and I’d either get fingerprints on it or I would turn it too far. Everything in jewelry photography is so slight and subtle that you need various delicate tools. You need to ever-so-slightly move the piece for placement.
Sharon: What did people do before Photoshop? I always wonder about that.
Kim: That is a great question. I wasn’t around for that, but I’ve heard stories where you would hand paint it. You would do it by hand.
Sharon: Oh, gosh! Did you come to this photography because you like jewelry so much or would any kind of photography have satisfied you?
Kim: It’s a combination of it starting off with my friend who’s now a jewelry designer. That really launched it. I have to say, as I started photographing more jewelry, I’ve come to love jewelry so much. It’s funny because I never knew my style, but now that I’ve seen so many pieces, I know what I’m into; I know my style. I have such an appreciation for that art. It’s really beautiful.
Sharon: What’s your style?
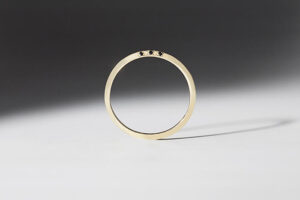
Kim: I love anything with starbursts or hearts. I love opals even though they’re a little difficult to photograph. I love classic pieces, like the classic gold band, a chunky ring. Actually, right now I’m wearing my favorite everyday ring. It’s one of my clients, Fox & Bond. I like anything feminine.
Sharon: Do you have to worry about photographing it if you’re wearing it, if there’s someone with an opal?
Kim: No, you don’t. I’ve discovered the trick for photographing opals. Right now, I’m in my room. If I’m looking at it now it looks a little flat, but out in the sunshine, then you see that colored marbling. It’s the same thing with artificial light. When I have it inside the lightbox, I need to almost recreate sunshine. I use what’s called direct light. That means I don’t have an umbrella on it. There’s no diffusion on it. It’s just hard light, and that’s when you really see all the saturated colors and what makes an opal so beautiful.
Sharon: I hesitate to ask, and you can tell me if this is too technical for somebody who knows nothing, but what is focus stacking?
Kim: Focus stacking is the technique of taking multiple photos of a single piece and quite literally stacking them together. The thing with a macro lens is that you’re getting so up close to the piece that it blurs out the rest of it. You might have the diamond sharp and in focus, but the shank is blurry; it’s out of focus. So, I very slowly twist my lens to get every piece in focus. It’s the diamond, then the beginning of the shank, then the middle, the back, every piece of it. This is especially important when you have engraving on the back of the band and you want that to be in focus. I typically take about 15 to 20 photos per piece. I use a special software called Helicon Focus. You plop those photos in that software and it knows how to stack them. It stacks them for you, and it spits out one sharp image. It’s really interesting. It knows what’s sharp and what’s out of focus and merges them all together.
Sharon: Wow, it sounds interesting! What are the top three mistakes you see when you look in magazines or at trade shows?
Kim: Oh, I see a lot. Some reflections are O.K. They help add dimension. Highlights and reflections add dimension to any piece, but I think when it becomes distracting, when it’s huge and you can’t see what’s going on or you go, “I see a person reflected in there,” that’s when it becomes distracting. That’s a big mistake.
And I think just making the stones look dull. That’s another mistake I see. You want them to look shiny and crisp. You want to showcase the piece at its best. That’s really, really important. Third, not photo stacking. I think it’s important to photo stack. I see a lot of websites where the back is out of focus. It’s soft. It would be nice to see the whole piece sharp and see how it looks because these pieces are so expensive. You’re sitting on a computer, and you really want to know what you’re ordering. I think it’s important with these luxury items.
Sharon: Do you think it’s true of less expensive items that aren’t thousands of dollars? I’m thinking of when I go to trade shows and they say to me, “What do I need good photography for?”
Kim: I think it’s important because, again, it showcases the piece in accuracy. Especially when you’re listing investment pieces or an engagement ring or whatever it is, I think it’s crucial. If it’s something that’s costume jewelry or lower end, maybe it’s not as crucial, but especially with these luxury pieces, you want high-quality imagery to showcase it.
Sharon: Sometimes I’ve seen pictures of jewelry where I’ve had to look for the jewelry itself because of the background. Maybe it’s a plant or something, but the jewelry has gotten lost.
Kim: Yeah, I was going to ask you that, actually. From your standpoint, when you’re online looking at social media, in front of the screen, is it distracting? I would love to hear your perspective. You have it from my perspective.
Sharon: Once in a while I come across a photo where I really have to look, like, “Where’s the ring you’re talking about?” or “Where are the earrings?” It all runs together.
Kim: Oh no, that’s not good. You definitely don’t want to not be able to find the piece, and you definitely don’t want anything distracting in the background. I want a solid-color background, ideally white. I’ve even had some of my clients—if there’s a reflection in it, maybe it’s the camera; it looks like a spot or a line—tell me that some customers think the piece is dirty. They don’t realize it’s a reflection. It’s important. It can make or break a sale.
Sharon: I have to ask you. My feeling is that jewelry is not as big here as it is on the East Coast in New York. Did you find a difference, and did you find a difference in finding clients where you were out here?
Kim: I really started my jewelry journey here in Los Angeles. Like I said, I was working a full-time job. I was a staff photographer at a fashion merchandizing company, so I wasn’t really pursuing clients. I think you’re correct in that the jewelry world is probably bigger on the East Coast, but from my own experience, I don’t know. I moved to Los Angeles and started here almost from scratch, but it’s been good.
Sharon: We will have photos posted on the website. Please head to The JewelryJourney.com to check them out.